Tofu Stuffed Giant Shells
Sally found a recipe that replaced the usual ricotta or cottage cheese with extra firm tofu. She had never had tofu, and this seemed like a good way to introduce her to the food. This is my version of that recipe.

12 oz box Jumbo Shell pasta
1-2 cups Pasta Sauce of choice
8 0z Extra Firm Tofu
1/2 cup Parmesan cheese
1/4 cup shredded Mozzarella
6 oz package Spinach Dip
3-4 cloves garlic minced
Herbs and spices of choice to taste -- I used an Italian Seasoning, plus dashes of basil, oregano, rosemary and thyme.
Fresh Basil leaves for garnish is a nice touch
Cook the whole box of shells to package directions. You're only going to use 16-20 of them, but if you've ever cooked Jumbo Shells before, you know that a lot of them will end up broken or otherwise useless. Keep the cooked but 'not so good' pasta for an application where shape doesn't matter.
Drain/press the tofu if it isn't very dry. The rough chop it and toss it in your food processor along with the cheeses, spinach dip and spices. Pulse -- short bursts -- to break up the tofu and mix in the other ingredients. You do not want a puree here, but you do want a stiff, spoon-able filling.
What A Great Cheese substitute!! I actually prefer this to any Ricotta-stuffed shells I've ever eaten. Sally loves it too. But after one nibble of plain tofu said "not that way"! Can't say I blame her, it's pretty tasteless by itself...
Put about a cup of pasta sauce in the bottom of an 8x12 or so baking dish. Then start filling the shells with a couple tablespoons of the filling, and laying the filled shells in the sauce.
Once the baking dish is full, pour more sauce on top of and around the shells. Top with more shredded mozzarella and some fresh basil leaves.


Skin-side Up or Down?
If you're going to pan-fry or sear your salmon, which side do you cook first? Search the 'Net and you'll find the "experts" pretty equally divided between skin-side up first or down first. Personally, after years of starting skin-side down, I've switched.
Reason 1 -- I'm not fond of eating salmon skin although other, including Sally are.
Reason 2 -- Whether I eat the skin or not, starting skin-side up lets me have more control over how crispy the skin is vs how done the whole piece of fish is. It's like doing a reverse-sear on Filet Mignon; another technique I've adopted with award-winning results.

Technique:
- Season your filets. I use just a dash of Everglades seasoningtm
- Heat (medium high ~ 350F) your skillet (nonstick is best but any will do). Add a spritz of Canola or Vegetable oil. Set your slab-o-salmon on the oil -- skin-side UP.
- Do Not move the fish for at 3-4 minutes. Let the meat sear and the natural fats release.
- Carefully flip the filet.
- Apply any seasonings to the seared surface of the fish.
- Do Not move the fish,
- After 4 minutes, carefully check underneath to see the degree of crisp on the skin. Want more? leave it alone for another minute or two (or even 3).
- Carefully slide your spatula between the skin and the pan, and plate the filet.
While I'm at it, why is it that we seldom see the "cross cut" slice of salmon any more? Years ago that's how salmon came -- a cross-section cut of the fish about an inch thick, with a piece of backbone in it and a little skin around the edge. Now all we see are side slabs with acres of skin.
Quickie Citrus Coulis
So... for my Salmon dish, I wanted to serve it with a Blood Orange glaze or couli.

Nothing on hand, of course, but I didn't want to make -- didn't need -- even half a cup of glaze. What to do?
Make a mixture of cornstarch and another dry ingredient to keep the cornstarch from clumping, then pour (in my case) the blood orange juice over it and stir to dissolve the powder in the liquid. For a fruit coulis, sugar is the natural "other dry ingredient", but others would do if you don't want added sweet.
How much cornstarch? One tsp of cornstarch per cup of liquid you want to thicken. I juiced out a blood orange and got right at 1/4 cup. Since the juice was a tad tart, I added 1/4 tsp of cornstarch to 1/4 tsp of sugar, YMMV. Then poured in my 1/4 cup of juice and stirred.
I put the mixture in the microwave for 3 minutes. Thickened nicely, thank you very much! Your time may vary, of course.

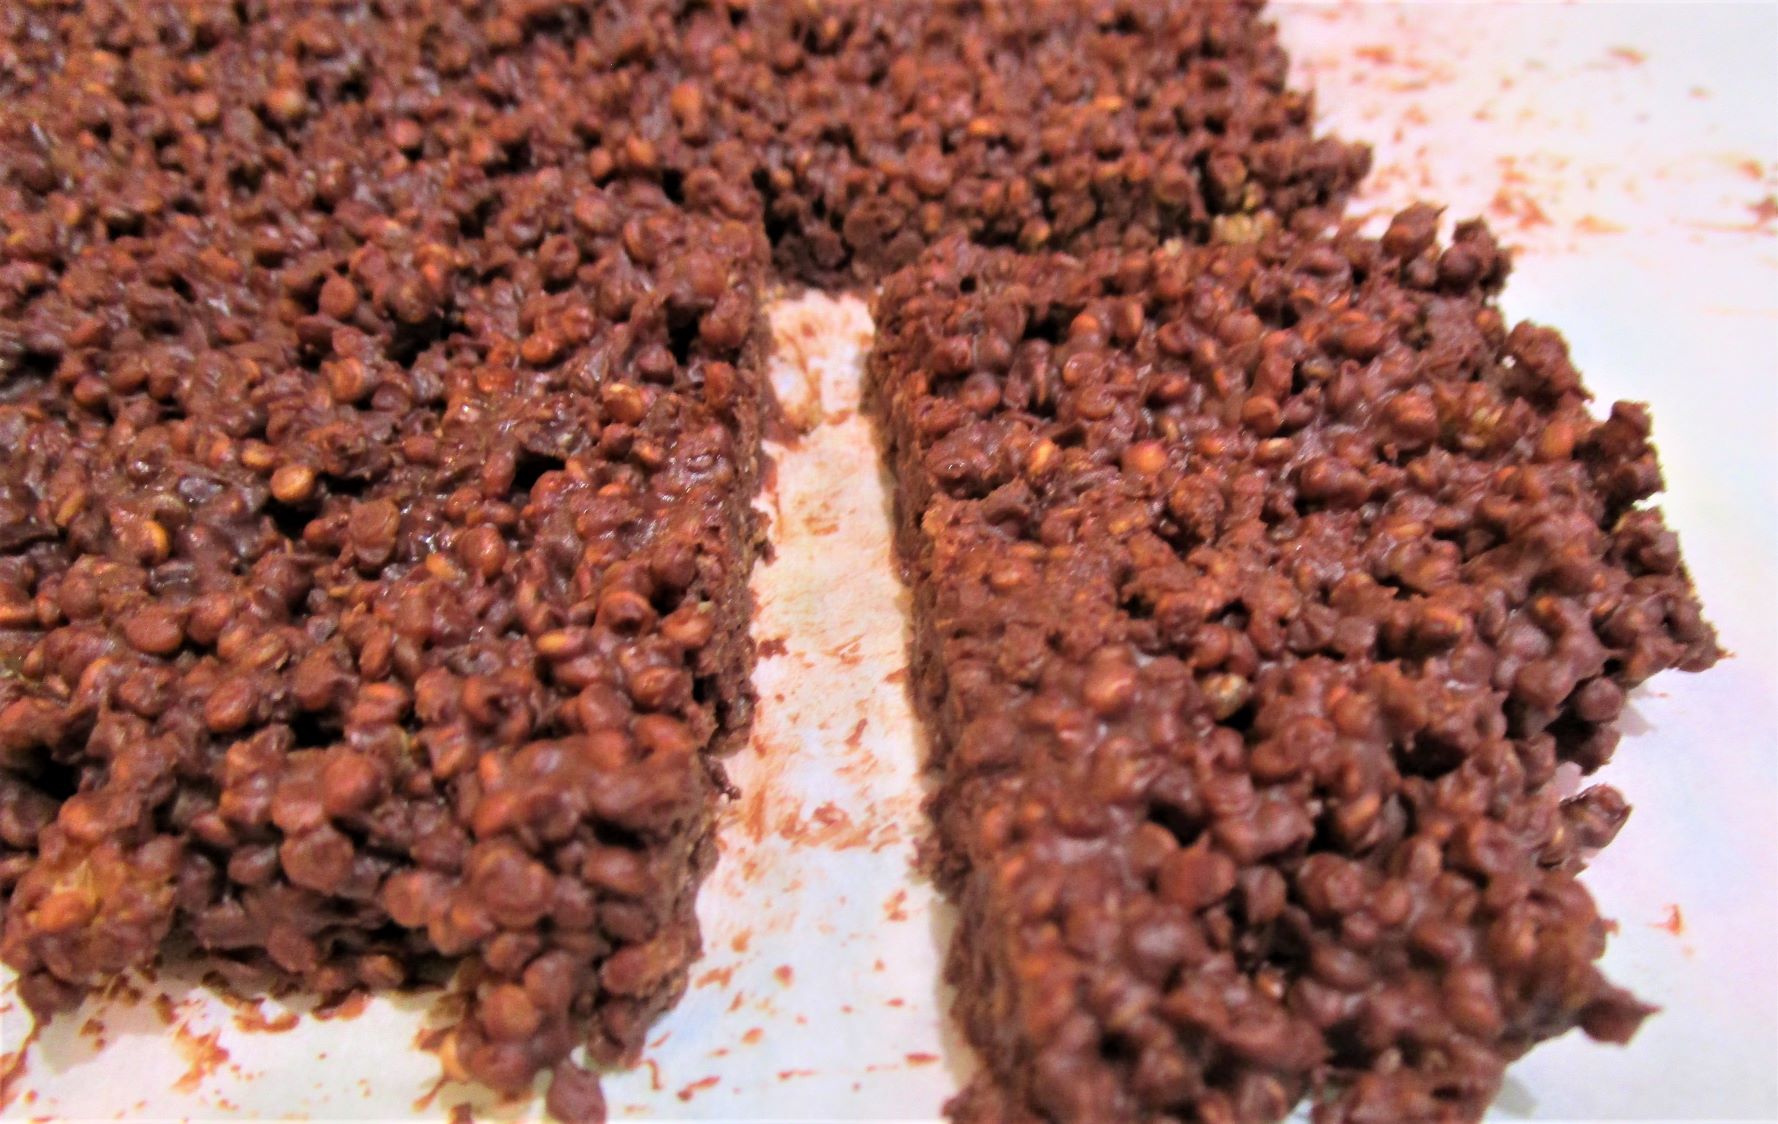
Crispy Quinoa Chocolate Treats
Sally's Mum brought us this packet of tasty chocolate-quinoa crispy treats, and suggested that I try to replicate them. I like a good challenge! Crispy quinoa and tempered chocolate, how hard could it be?

Microwave Crispy Quinoa
First step is to cook up a batch of quinoa. Don't use quite as much water as the directions suggest. That way there will be less water that has to leave to make it crispy.
 |

Use a spatula to stir the grains around, and broil for another 2 minutes.
If this is dark and crispy enough, great. Otherwise go for another minute. Don't let them burn!

Cool and remove to an airtight storage container. These are also good in salads, topping yogurt or smoothies, and lots of other applications where you want a little crunch. But I'm going to make crispy chocolate bites. To do that I need to make:
Microwave Tempered Chocolate
Tempered chocolate is what you need to have to make candies and things that set at room temperature and don't melt into a puddle. The trick, chemically, is to get the crystals in the chocolate to line up in just the right way. You can do this with a double-boiler and patience; and that's great for 'mass quantities'. But I don't need to make gallons of the stuff!!
First off, you gotta use real chocolate -- milk or dark -- with cocoa butter, not some better-living-through-chemistry chocolate colored sweet imitation. Get the semi-sweet chips, unless you're hardcore milk chocolate fan. Check the ingredients for cocoa butter! You're also going to need a thermometer -- you want at least 88F, but never want the temperature of the chocolate to exceed 93F!
Put 6 oz of chocolate chips in a micr0wave safe bowl. Nuke them for 30 seconds. Read the temp and stir. Repeat. And again. Now nuke for 15 seconds. Then 10 seconds. You should have a smoothly melted mass of chocolate.
Make The Treats
To make the Crispy Quinoa Treat, add 6 oz of roasted quinoa to the chocolate, and stir to combine. Now line a tray or plate with parchment -- you'll want at least a 10x10 area papered. Dump the quinoa-chocolate mix in the middle of the paper and using a wet spatula, spread and smooth the mixture to a little less than 1/4" thick. Then pop it in the fridge for an hour or so to cool. Slice into pieces and try not to eat the whole batch in one sitting!
I needed something for Sunday lunch with Mum that would make leftovers. Sally suggested a lasagna where I could use up the 'leftover" tofu from the Shells recipe, as the nominal ricotta layer in the strata. In our Produce box this week, we got a great bundle of assorted 'wild' mushrooms including crimini and oysters. The light went on -- Mushroom Lasagna!

1 box Lasagna Noodles
8 oz Tofu, cubed
1 lb assorted Mushrooms -- I had crimini, oyster, large white and more
1/2 cup Parmesan
1/4 cup Mozzarella
1/2 cup Skyr yogurt
1/4 cup Spinach dip
1 bag fresh Baby Spinach
Pasta Sauce of choice
30-40 Cherry Tomatoes, halved lengthwise
1 Red Onion, diced
1/2 Red Bell Pepper
1/2 Yellow Bell Pepper
4-5 cloves Garlic
Herbs and spices of choice
Broil the spiced & herbed tomatoes, garlic, peppers and onion just until the tomatoes soften -- about 8 minutes. Reserve.
Slice the mushrooms to more or less equally thick/thin pieces, and saute them just a couple minutes in a bit of butter with more herbs. Reserve.
In your food processor combine the tofu, parmesan, m0zzarella, Skyr, and dip. Process into a ricotta-like spread. Reserve.
Now it's time to lay down the various layers of this classic strata-dish. Start with a schmear of pasta sauce in the bottom of your 8x12 or 9x13 baking dish. Lay down a layer of un-cooked lasagna noodles on top of the sauce.
You know the drill from here. Layers of "goodies" alternating with layers of pasta. My sequence (from bottom to top) was:
broiled veggies
fresh spinach with a splash of pasta sauce
faux ricotta
more veggies
sauted mushrooms
As you can see, I saved the mushrooms for the top layer and then top dressed that with shredded cheeses.
Pop the whole thing in a preheated 350F oven for 45 minutes. Check the bake every 15 minutes. If it starts to get too brown or too dry, cover with a layer of tinfoil. When baked, rest the lasagna at least 10 minutes before cutting and serving.
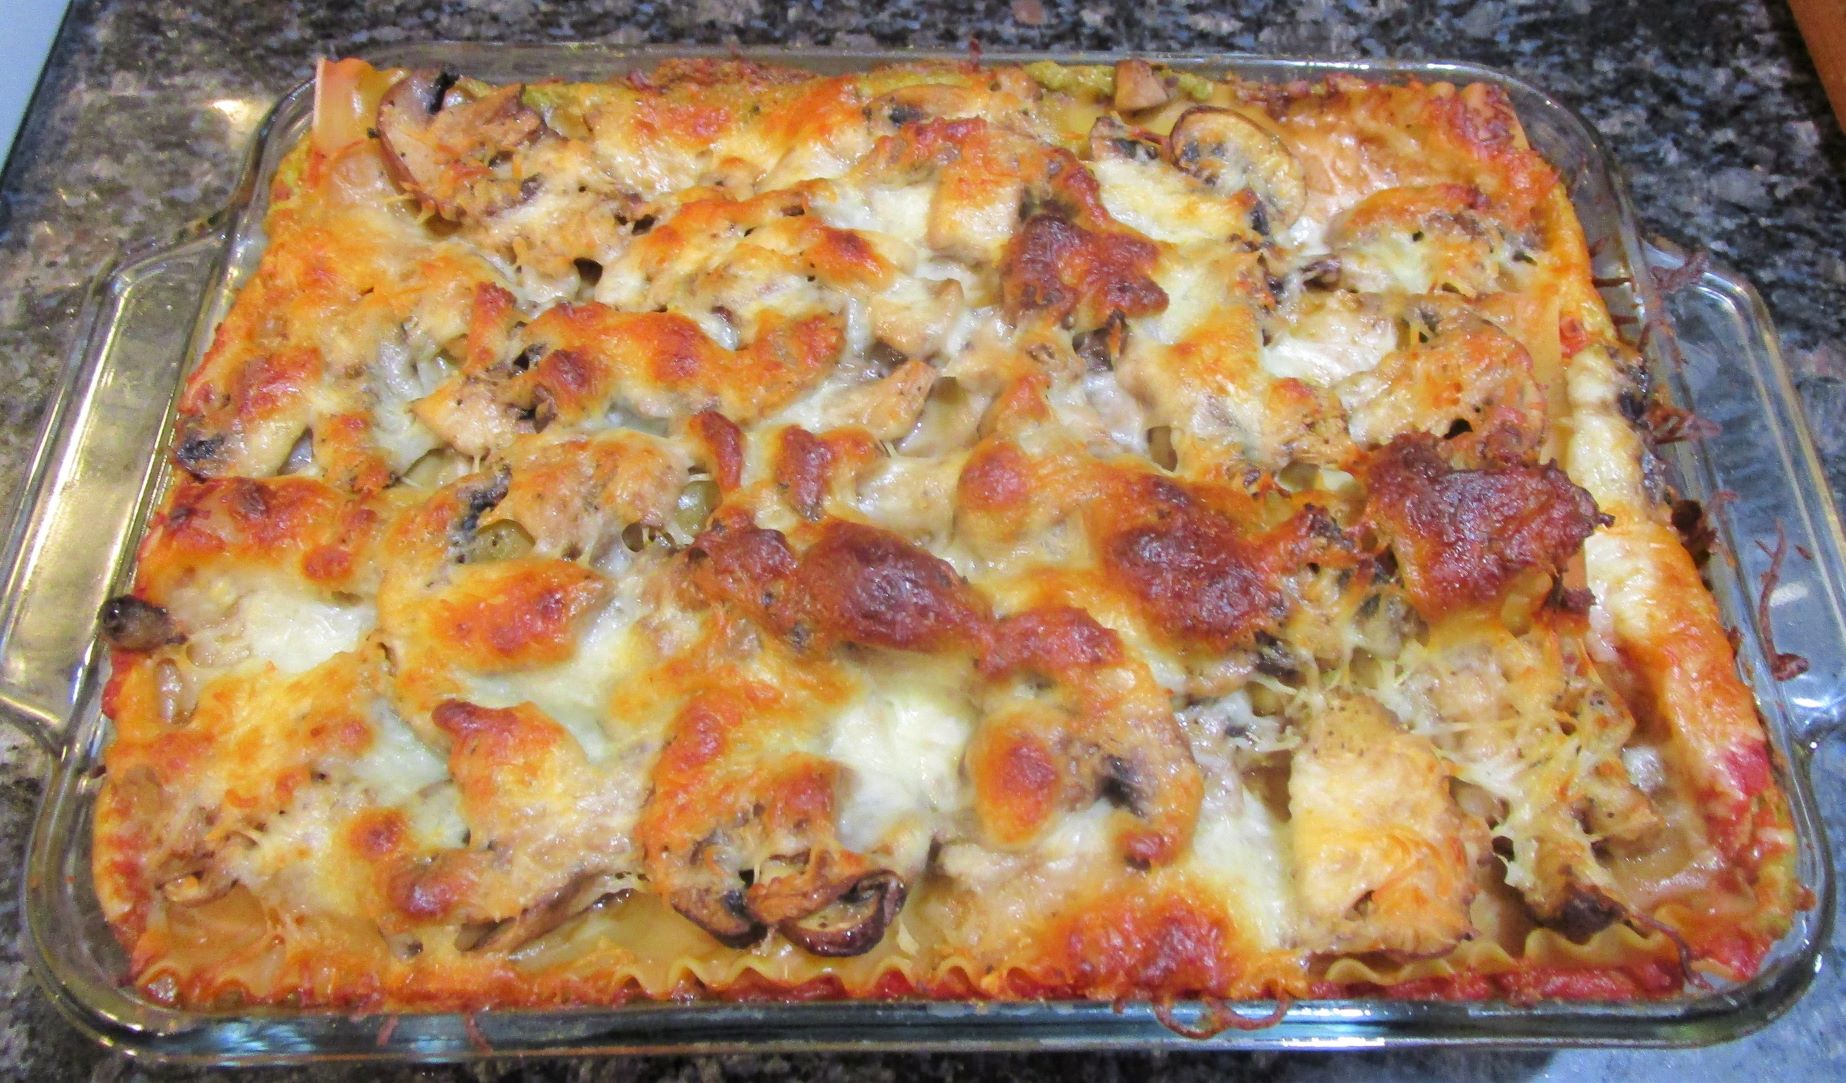
The leftovers have been fabulous!!
No comments:
Post a Comment
What's up in your kitchen?
Note: Only a member of this blog may post a comment.