Monday, April 10, 2017

Bison, Quinoa, Plum Sauce, and First Flan

Bison Meatloaf
Awhile back Sally's Mum brought us two 20 oz packages of ground bison. The first one went into a Bison Pot Pie that I reported to you six weeks or so back. This package will make Bison Meatloaf, my own recipe.
Bison Meatloaf with fresh green beans, mashed potatoes and gravy

20 oz Ground Bison
1 large Shallot, diced
1/4= Sweet Onion, diced
1 can Ro*Teltm, Chili Fixins
8 0z Mushrooms chopped/sliced
1 cup uncooked Steel Cut Oatmeal
2 strips uncooked Bacon, cut to fit
S&P TT
Optional – Sweet Chili Sauce

Pre-heat oven to 350F

Combine the ingredients in a mixing bowl, and transfer to a loaf pan and shape the meatloaf. As a kid, I thought that that deep rectangular pan was called a “loaf pan” because that's what my Mom made meatloaf in. Imagine my surprise when I saw someone bake a loaf of bread in the meatloaf pan!!

Like my Mom, I still press a groove into the top of the meatloaf and pour some sweet chili sauce into the groove. Mom's chili sauce was home made, and I've lost the recipe. These days I use Frank's Red Hot brand Sweet Chili Sauce.

Bake the meatloaf 45-60 minutes; do not overcook, or you'll have a rectangular hockey puck!

The beauty of a bison meatloaf is that it is 97% fat free, and you won't find your finished loaf floating in a pool of grease. The disadvantage of a bison meatloaf is that it may not contain enough fat to cook properly. I compromised by topping the loaf with bacon which, as it cooks, will work its way into the ground meat and add just a hint of flavor as well as some fat to keep things from being too dry.


Quinoa with Spinach & Goat Cheese
Is this a salad? Or a side dish? You decide! Either way this is pretty tasty stuff!

3/4cup Quinoa
1-1/2 cup Water
4 cups Baby Spinach
4 cloves Garlic, minced
4 Tbsp Goat Cheese
1 Tbsp EVOO
1/2tsp Cracked Black Pepper

Boil the water, add the pepper and quinoa. Cover, reduce heat to low and cook 16 minutes. Fluff with a fork, re-cover and let it rest for 10 minutes.

In a large pan, saute the garlic with the oil – don't let it burn! Add the spinach to the garlic and saute a minute or three until wilted. Toss everything together in a large mixing bowl, divide between plates, and top with the goat cheese.

I served this with “Greek” Chicken – breasts spiced with Cavendar'stm and Ultimate Garlic Insanitytm, a salt-free spice blend from Auntie Arwen's Spices www. auntiearwenspices.com.


Plum Sauce Test
I had a fabulous lamb dish called Plum Lamb at the Persian restaurant Bha Bha in Naples last weekend, when we went to see The Merchant of Venice, and I want to try re-creating the dish for Easter. This was my first attempt to re-create the sauce, which is the critical ingredient for the dish – anyone can slow roast lamb!

16 Dried Plums (with stones) soaked overnight in water
1/2 tsp Cumin
Water
1/2 tsp Turmeric
5 Black Cardamon pods
1 Beefsteak tomato, chopped
½ white Onion, diced
Balsamic Vinegar
Worchestershire Sauce

Dried plums are the hard to find ingredient. These are not your average “American” prunes, but a “sour plum” which has been dried/salted. I found them, not at the local Mediterranean market, but at the Chinese market next door.

Simmer everything in a couple cups of the soaking liquid for 30 minutes, remove pits from plums and remove the cardamon pods. Puree everything else, and return it to the pot. Adjust the sweet/tart ratio with balsamic vinegar and Worchestershire sauce. I discovered that too much balsamic will leave a harsh vinegar-y taste which you don't want. If you need to thicken the sauce, add a dusting of Wondratm as desired.
Plum Meatballs and Yam Coins with Rice

The test turned out really successful, except for a slight excess of vinegar. Silky smooth, rich and just plain unctuous! More Worchestershire next Sunday!


Flan
I've eaten my share of Flan over the years, but never made it. Now I wonder whyWe were gifted with all these wonderful eggs, and I needed to use a good number of them. Flan is/was the perfect solution.

This looks like a long complicated recipe, but it isn't. Trust me it's worth the effort to read ahead!

The quintessential Latin dessert, this alternative to cheesecake is not only creamy and oh so tasty, but it's pretty darn simple to make too. I scouted a bunch of recipes and came to my own recipe and techniques that make this a snap!

Caramel Topping
Flan invariably has a caramel upsidedown topping that needs to be made, applied to the baking vessel (mold), and allowed to cool before the eggy custard is poured into the pan prior to baking. It's a critical facet of the dessert, and if you make it the older way and don't pay attention – remarkably easy to burn and ruin.

The old way was a pan, some sugar, some water and boil until the sugar melts and caramelizes without burning. The easy way is a microwave safe container:
Put 1 cup of sugar and 1/3 cup of water in the container – a 2 cup Pyrex measuring cup is the perfect size. Stir things up a bit, and start microwaving for 5 minutes. When you pass the 4 minute mark keep a real close eye on the color of the liquid and stop immediately when the “right” color is reached. Depending on your microwave, you may have to go longer – in 30 second increments, to get the right color. Mine took about 7 minutes and 30 seconds. Watch closely and stop the second you get that dark amber color!

When you've got the magic color, pour the caramel into your mold pan and swirl it around to coat the bottom. The caramel has to harden before you can proceed further – plan on at least half an hour in the fridge for that to happen.

Looking at a bunch of recipes it's really hard to tell what size pan you need. I used a 1.5 quart Pyrex “pie” dish, and 5 silicon ramekins (I had to make a second batch of caramel for the ramekins). One site had the perfect solution – use a bundt pan. It's deep enough for the most massive flan, and will yield a much more decorative final product. Make sure you get that caramel up on the bundt pan's stem as well! That's what I'm using next time! Don't try to use springform pans for this – they just aren't made to be leakproof!

The Custard
We've been blessed with a bunch of eggs from one of Sally's work friends, but they are smaller than the average Large commercial egg – more like a medium. The Puerto Rican version of flan is much denser than flan from other Latin countries. Where others use 6 eggs, the folks from PR used 8 or even 10 eggs, and I did likewise. Here's my basic recipe for the custard:

1 cup Sugar
8 large Eggs
1 14-oz can sweetened condensed milk
2 13-oz cans evaporated milk
1 Tbsp Vanilla extract
1 Tbsp Lemon extract

Preheat oven to 350°. Prepare a bain-marie (large, deep pan to hold a water bath around the mold dish). The hot water will go only half way up the side of the mold dish. Don't put the water in yet. 

Put the custard ingredients in a blender and process until well blended, but don't over mix. Pour the custard into the caramelized mold, cover with foil, and sit in the baño de María (Spanish for  bain-marie or water bath). Then pour hot water into the baño and carefully place in the oven for 1 to 1-1/2 hours until and a toothpick comes out clean.


When it came time to serve, I ran a knife around the edge, inverted the Flan onto a plate, as per directions, and removed the mold. Perfection!

The extra mini's that I made were slightly overcooked (I cooked the pan of those for 45 minutes during the same hour as the main flan). I ended up with a hardened disk of caramel on top of each mini, and not much runny sauce, so be warned to lessen the cooking time if you plan on making a batch of mini-Flan.


Monday, April 3, 2017

Tortilla Sandwich? Chiffonade, Pakoras and a Salad

Tortilla Sandwich
Take a breakfast dish and turn it into lunch. That's what the Spanish do. Well, we think of eggs and fried potatoes as breakfast, but in Spain it can be lunch, dinner, or a sandwich.
Tortilla de Patata

I'm talking about the Tortilla de Patata, which I've chronicled here before – slices of pan fried potato smothered in beaten eggs and a handful of onion, slide on the broiler to finish. In Spain the dish is eaten hot, or at room temperature, or in this case, as a sandwich.

Sunday I ended up with a “spare” tortilla de patata, so we decided to make a dinner sandwich with this 'leftover' and some nice Cuban bread.

For the Tortilla:
1 largish Red Potato, cut into slices 3/4” thick, and par-cooked for 6-8 minutes in the microwave
2 Eggs, beaten
3 Green Onions, chopped
Fresh ground Black Pepper, to taste

In a 9” oven-capable skillet, heat a splash of olive oil and then fry one side of the potato slices. You can, of course make a large tortilla in, say, a 12" skillet with more potatoes and 3 eggs.  

When nice and brown, flip the potato slices over, pour the beaten eggs overall, toss on the green onions and add a few cracks of black pepper. Turn the broiler on high, and transfer the pans to a top level rack. Broil for 1-3 minutes, until the tortilla is puffy and nicely browned. Transfer the cooked tortilla to a plate.

For The Sandwich:
Bread – a French or Cuban loaf will do since you probably won't find Spanish bread in your megamart
1 beefsteak type Tomato, halved
Optional - a large clove of garlic (or an entire head which has been roasted) with the end sliced off, for rubbing

Once the tortilla has cooled, halve it, and slice open a 9” length of good bread. Rub the cut face of the tomato all over both sides of the bread. This is a very Catalonian technique. Bread served this way with cut garlic for rubbing too, is called Pa amb Tomàquet – Bread and Tomato – a Catalan appetizer.

Lay a half of the tortilla in the bread, and serve.

Americans will probably want to add a schmear or salsa and/or slices of tomato to the sandwich.


Technique – Chiffonade
This one is for our English friend Fiona.

Chiffonade is a fancy French cooking term for rolling up leaves of herbs and slicing them very thin, into strings. Last week I made a chiffonade of mint; here's how:

Stack some herb (mint, basil, etc) leaves.

Roll them tightly around the central stem.

Slice at right angles to the roll.

Use as a garnish or in dishes.


Pakoras
These Indian fritters are a great accompaniment to any Indian style dinner. I served them with Channa Dal - a dish of cooked, spiced chickpeas with diced onion and tomato added at the end. Next time I'll serve them with Butter Chicken, a dish we both love.

1 cup Besan (lentil or chickpea flour) from your Indian Market
3/4cup Water
1/2Onion, diced fine
1 tsp minced fresh Ginger
1/2tsp Red Pepper Flakes
1/4tsp each ground Coriander and Cumin
1 cup fresh spinach leaves chiffonade and then chopped (or 1/2cup thawed frozen chopped spinach)
Salt to taste
1 quart Vegetable Oil for frying

Mix the flour and water, then add everything else except the oil; stir well to combine into a sort of lumpy pancake batter.

In a heavy-bottom pan, bring the oil up to 350F on your thermometer. Drop the batter by spoonfuls into the hot oil, two or three at a time. Turn over when one side is GB&D, and remove when both sides are golden. Drain on paper towels, sprinkle with salt, and serve hot; with chutney on the side. I found a fablous Mango Chutney at my neighborhood Indian market that will also make a great glaze for Salmon or other fish.


Green Bean, Tomato & Corn Potato Salad
Had a bunch of these ingredients in our Co-Op box last week, and needed to do something with them. This Potato Salad variant isn't as heavy in the spud department, making this a bit on the healthier side.

2 ears of Corn
1 medium Beefsteak Tomato
1 lb Green Beans
3 Medium White Potatoes
Salt & Pepper to taste

Dressing:
White Wine Vinegar
Dijon Mustard
EVOO – I used a special Basil-infused EVOO which I was gifted at the holidays

Peel and boil the potatoes, until done but firm. Tip & tail the green beans and blanche them for 5 minutes in the microwave with 1/4cup water added to the bowl. Slice the corn off the cob onto a plate, and chop of the tomato.

In a bowl or measuring cup, combine 3-4 Tbsp of mustard with about the same amount of vinegar. Whisk in the EVOO until things are emulsified and the oil/vinegar stays together as a viniagrette.

Toss to combine all the veggies, then pour the viniagrette over and toss again. Salt & pepper if necessary. Can be eaten warm, but I prefer to chill things for an hour before serving.

I liked the corn raw; but Sally would have preferred it cooked. She also wanted more potatoes that I had included. The viniagrette was really good, but use it sparingly.

I served the salad with Mango Chutney Glazed Salmon, and it was a great accompaniment.


Monday, March 27, 2017

"Green, green, it's green they say..."

..."On the far side of the hill."  ~~ New Christy Minstrels

Both dishes today are green and I even threw in a green plate!  

Minted Frozen Pea Soup
I am definitely NOT fond of split peas soup, canned peas, or English Mushy Peas.
But...

 I have always liked frozen green peas.  This fabulous soup changed my mind forever about pea soup! 

2 lbs frozen Green Peas  -- the giant bag!
2 Tbsp Butter
1 Tbsp EVOO
1 Onion, diced
2 cloves Garlic,chopped
1/2 tsp Nutmeg, fresh grated is always best
1 quart Low Sodium Chicken or Vegetable Broth, or waer n low-sodium bouillion
3-4 Tbsp Mint chiffonade
2/3 cup Half & Half
Kosher Salt and White Pepper to taste

In a stock pot, saute the onion in the butter and olive oil until it turns translucent. Add the garlic and nutmeg, and saute another couple minutes. Add the frozen peas and broth and simmer for 10-15 minutes to let the peas thaw and cook. Add half the mint.

Transfer soup to a blender and puree (or use an immersion blender). Return soup to the pot, stir in the half & half and add salt & white pepper to taste. Cook another few minutes, then ladle into bowls and garnish with more mint.

I served this with Sweet Italian spiced Chicken sausages on the side.


Crunchy Salmon with Apple & Baby Kale Salad
I'm not particularly fond of Kale, but Sally wanted to try this combination. The Crunchy Salmon is great; the salad, IMHO was OK, but the dressing needed at least twice the acid/lemon shown, but “your mileage may vary” as they say.


Crunchy Salmon
2 Salmon fillets, 4-6 oz each
1 Green onion, diced
1/2 cup Panko
2 tsp Lemon peel, minced fine
S&P TT

Preheat oven to 425F. Spray a baking tray with non-stick.

Lay the salmon on the tray and dust with salt and pepper. Combine the green onion, panko and lemon peel. Divide the panko mixture onto the tops of the salmon fillets and pack it down. Add a single spritz of non-stick spray to each pile of panko mix. Bake for 8-10 minutes

We also tried the crunchy topping on Mahi Mahi, and it was just as fabulous;  adjust the amount of zest to your taste, we like ours Lemony Snicket.

Apple & Baby Kale Salad
Juice of a Lemon (two would be better)
3 Green Onions, diced
2 tsp Dijon or similar mustard
3 Tbsp EVOO
1 thin sliced Apple* (I used a Fuji; Sally thinks a Granny Smith would be better)
3 cups stemmed Baby Kale (stemming is a major pain, but majorly necessary).
3/4 cup cooked, rinsed & drained Quinoa (I didn't have any on hand, so I used orzo instead).

* use the blog's Search function to find my technique on how to fillet an apple. Then cut the thin slices into smaller pieces.

In a large bowl, whisk together the oil, Dijon, and lemon juice. Add the kale and apple and toss/stir to coat/combine. Add the quinoa and toss again. Serve alongside the Crunchy Salmon.

March came in like a lion and seems to be going out like a lamb
Hmmmm..lamb... roast lamb.... mint sauce....    
Anybody hungry?


Monday, March 20, 2017

Wind In The Willows, Minted-Honey Glazed Chicken & Corn Pone

Toad In The Hole
Mister Toad is the fascinating character from Kenneth Grahame's classic The Wind In The Willows; whether the wily amphibian had anything to do with naming of this dish is beside the point!

Toad in The Hole is a classic English lunch/dinner dish, that is not the same as the American breakfast with the same name. The American dish has an egg fried in a hole cut from the middle of a slice of toast. The English dish is fried sausages in pastry similar to Yorkshire puddings.  Here's how:

2 cups AP Flour, sifted
2 cups Whole Milk or Half & Half or just plain water
1/ 4 tsp Kosher Salt
3 Eggs
1/8 cup Lard
6 Banger Sausage – about a pound – can't find Bangers, any good, non-Italian sausage would do (Kielbasa,Bratwurst, Linguica, etc)

Put the lard in an 8x12 baking dish in a pre-heated-to-450F oven. Let things get very hot – say 15-20 minutes.

While that's going on, beat the eggs and milk together in a container. In a bowl, combine the sifted flour and salt, then slowly pour in the liquid while stirring to avoid lumps. Beat with a whisk to completely combine things and add more liquid as necessary make a thin crepe-like batter. Rest the batter in the fridge while the pan continues to heat.

When the pan is “disfiguringly hot”, carefully lay in the sausages and bake them for 5 minutes on each side.

Now that the sausage are partially cooked, carefully pour the batter over everything, and return the pan to the oven. Set the timer for 20 minutes and don't peek!   At the 20 minute mark, check the Toad to see if the batter is now GB&D. You may need another few minutes to get a nice crusty all-over brown.

Cut the Toad into portions and plate with mashed potatoes and peas, the two classic English accompaniments. Some nice Bistotm gravy goes good here, as does a bit of nice sharp mustard.


Corn Pone
Ask six people their recipe for corn pone and, if they understand the question, you'll get at least seven answers!  

Corn Pone is an old fashioned dish, similar to, but not the same as corn bread. Cornbread can approach corn “cake” in thickness and richness. Corn pone is pancake thin, and fairly stiff (chewy), except when hot. A couple of corn pones was considered 'travel food' for a day in the woods by our pioneer forefathers.

Pone is simpler than cornbread but still has a number of variables. Some combine corn meal and wheat flower; some add eggs, some add sugar, or both. People argue over whether the corn meal should be yellow or white; should you use baking powder or baking soda or both, and on and on.

We had a guest stay with us who was doing the gluten-free thing.  I wanted to do some sort bread – thing for her, and decided to do a very simple corn pone – meal, water, salt and baking powder; cooked in a skillet in the oven. So I did a test – regular southern white corn meal versus the special PAN flour used to make Arepas. Which would cook up better, and taste better?

I made two batches of dough, each with 1 cup of flour, 1-1/4 cup water, 1/4 tsp Kosher salt and 1 tsp of baking powder. Each batch was stirred together and rested for 15 minutes to allow the flours to re-hydrate to the fullest. They were then cooked in identical pans for 15 minutes in a 450F oven.

The regular white corn meal pone was OK. Not great, or particularly tasty, but hey! what do you want from cornmeal and water? Crispy on the outside and rather dry on the inside.

On the other hand, the pone made from the PAN flour was pretty tasty! Crisp on the outside and soft inside, with the distinctive “corn tortilla” flavor of Latin masa flour. 

 Even a day later, this pone was still nice and soft on the inside, although the outside had lost its crispness.


Goat Cheese Stuffed Minted Honey Glazed Chicken
This one is Sally's idea. We had fresh mint and chicken breasts, and Sally was jonesing to use some of the goat cheese we had recently gotten at Costco. So I made this up as I went along...

2 Chicken Breasts
2 Tbsp minced fresh Mint
1/4 cup Honey
2 oz Goat Cheese
Cavender's Greek Seasoning

Stir the minced mint into the honey and reserve.

Saute the breasts in a splash of EVOO 5-6 minutes per side, basting each side with the minted honey.

Remove the meat from the pan and butterfly the breasts by slicing nearly in half through the thickness. Lay the cut side of each butterfly back in the pan for a minute or two while you glaze the top and bottom.

Remove the breasts again, and place 2 or 3 coins of goat cheese between the cut faces as you close the butterfly's wings and press lightly. 

 The heat will slightly melt the goat cheese as you plate and serve. Brush with any remaining honey as you serve.  I served ours with a saute of bell peppers, shallot, and chopped tomatoes, spiced with Cavender's.


Monday, March 13, 2017

And Now For Something Completely Different...

Cue the Monty Python's Flying Circus music!


Pickled Strawberries?
I've grown, picked/hulled/eaten strawberries all my life, and never heard of pickled strawberries until the other day! These puppies are the brainchild of Houston chef Chris Shepherd, who seems to be on a mission to pickle and serve almost everything! Makes about 2 cups.
1 Tbsp Sugar
1 tsp Salt
1/4 cup hot Water
1/2 cup White Wine Vinegar*
7 oz. (1-3/4 cups) Strawberries (about a dozen nice sized berries)
1 Rosemary sprig*

* Herbs and vinegars can vary according to personal whim. Think basil, rosemary, marjoram or mint for herbs; sherry, apple cider, white balsamic, or rice wine vinegar...

In a pint-sized heatproof glass jar, stir the sugar and salt with the hot water until dissolved. Add the vinegar and let cool to room temperature. Stir in the strawberries and add the herb sprigs; the strawberries should be covered by the brine. Cover and let stand for at least 20 minutes and up to 1 day in the refrigerator.

Well, you know me – anything worth doing is worth overdoing; so I let my strawberries pickle a few extra days.  In retrospect, this may not have been such a good idea...


Farinata – Garbanzo Bread
I've been a fan of unleavened breads, for quite some time. Especially those cooked on a griddle or grill rather than in an oven, I found this recipe in The Mediterranean Diabetic Cookbook by Amy Riolo, which Sally picked up for me at a recent diabetes educator conference. The recipe is Italian in origin and quite simple to make and cook.  Originally farinata was cooked on a copper pan over a wood fire; using your oven broiler gives a similar result.

1 cup Chickpea flour
¾ tsp Kosher Salt
2 Tbsp EVOO
1-1/2 cups Water
Black Pepper to taste

Stir everything except the pepper together in a bowl and let it rest for at least two hours so that the flour can totally absorb the liquids.

Fire up your stove's broiler with a shelf 4-6” below the elements; or if you have a grill, get it roiling hot instead.

Give the rested mixture a stir – yes it's very runny. Pour the mixture into a lightly greased or sprayed baking sheet, spread the batter out a couple millimeters thick, and set in under/on the heat. If using the broiler, keep the door open a crack while cooking.

Cook for 15-20 minutes until nicely browned. Lay on a little butter, then dust with black pepper (or Italian Seasoning), and serve hot; it's OK an hour later, but not good the next day. Amazingly, even though the bread is less than 1/8” thick, it still has a nice spongy internal texture and a great crust (sort of like a soft cracker), and a great nutty taste.


Tomato & Green Olive Rustic Tart
Sally found this recipe in a Better Homes & Gardens magazine, and it sounded realllly good. The original called for a special crust that would have been more like a short crust for a pie; I used a tube of pre-made pizza dough because I was feeling lazy.

1 tube Pizza Dough
1 package Cherry Tomatoes
Fresh Rosemary
1/4 cup Alfredo Sauce
3 oz Goat Cheese (Feta might be good too)
7 oz jar Green Olives (pitted but not pimento stuffed)
Italian Seasoning

Pre-heat oven to 400 F. Slice the tomatoes and olives in half. Spread the pizza dough out on a baking sheet and dock the bottom with a fork, leaving a 3/4” rim. Pre-bake the crust 10-12 minutes until just starting to brown.

Brush warm crust with the Alfredo sauce. Artistically arrange the olive and tomato halves, and dot with bits of sliced goat cheese. 

 Scatter rosemary leaves across the top and lightly dust with Italian Seasoning. Bake for an additional 15 minutes until GB&D. Serve with a small Mediterranean salad (lettuce, olives, cucumber, tomatoes, feta, oil & vinegar).


No-Fail Tart Crust
Pretty much what the title says. . . just don't break those yolks!  This is the recipe from BH&G magazine.  Makes a nice 12” round, flat tart, the 9” deep dish shown below, or a 9x11 rectangular “rustic” tart crust.

1-3/4 cup AP flour
1 stick unsalted Butter
1/2tsp Salt
2 Egg Yolks
3 Tbsp Ice Water

Preheat the oven to 450F In your food processor, take the flour salt and butter for a spin until the mixture looks like fine crumbs (takes 10-20 seconds of pulsing). Don't overdo it!

In a small bowl whisk together the water and the yolks. With the processor running, add the yolk mixture and stop spinning as soon as the dough comes together in a ball – about 5 seconds!

Roll the dough out between sheets of waxed paper to fit your tart pan; transfer to said pan, and tuck the dough into the corners, if any. Dock the bottom with a skewer or fork, and bake it for 10 minutes. Turn the temperature down to 350F and bake another 8-10 minutes until the crust is nicely browned. Let it cool completely before adding toppings.   

Rich and buttery, this a great crust, suitable for both savory and sweet tarts.  Here I used it for a savory dinner tart:

Asparagus-Yam Tart
The tart pictured above has the crust brushed with thick bleu cheese dressing, then a layer of thin pre-cooked yam “coins” is laid down. The coins were cooked about 3 minutes in the microwave. The yams are topped with pre-cooked asparagus tips (again about 3 minutes) and then the whole thing was sprinkled with shredded cheese (I used a 7 Cheese Italian blend). Bake the completed tart 10-12 minutes @ 350 F to warm things up and melt the cheese.


Pickled Strawberries in a Salad
To accompany the Asparagus-Yam Tart, I made a light salad with red leaf lettuce, carrot and Cubano pepper shreds, a sprinkle of sunflower seeds, and the Pickled Strawberries which I made earlier in the week.


The strawberries were the feature, of course! Tart-salty-sweet, the flavor is “interesting”... not unpleasant, but it'll take eating a few more for me to really come to like them, I think. Definitely worth the try.  They would not have been so salty had I stopped the pickling after a day (or overnight) in the brine rather than a week.

Monday, March 6, 2017

Salmon w/ Leeks, Moroccan Lemon Chicken and More!

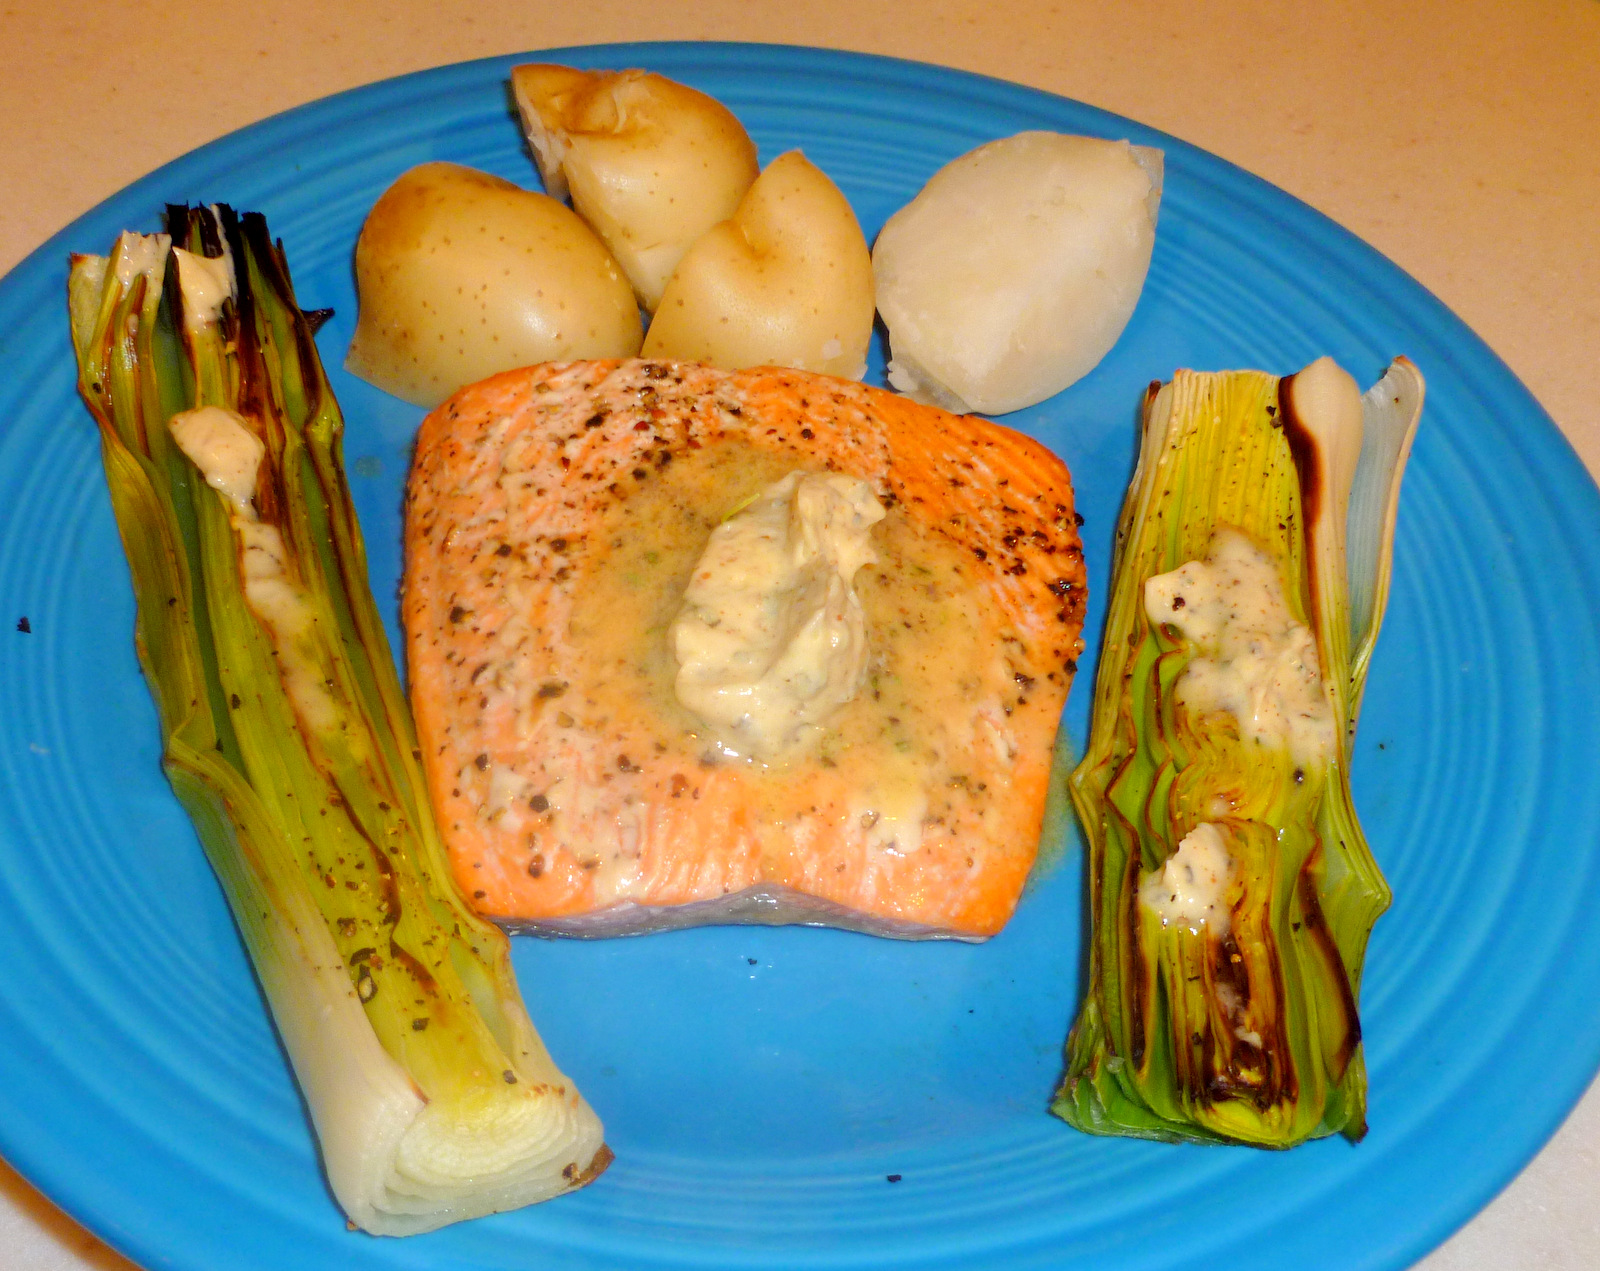
Salmon & Leeks with Rosemary-Dijon Butter
Sally found this in a Better Homes & Gardens magazine. The original was done on a grill; but we don't have one, so I used the upside down grill called the broiler.

2 Leeks
1 sprig fresh Rosemary
2 Salmon fillets, 4-6 oz, skin on, 3/4” thick or so
1/4cup unsalted butter, softened
2 tsp Dijon Mustard
EVOO as needed
S&P TT

Trim ends from leeks and halve lengthwise. Keep the leaves together as you wash and dry them. Brush with EVOO and give them some salt and pepper.

Grill the rosemary sprig 1-2 minutes until lightly charred; reserve while you grill the leeks 5-7 minutes until tender, turning occasionally. Remove and keep warm.

Season the salmon with salt & pepper, and brush with EVOO. Grill the skin side 4 minutes, then turn and grill the other side 2 minutes or until the meat flakes easily.

Strip the leaves from the rosemary sprig and chop them fine. Stir 1 tsp of chopped leaves together with the butter and mustard. Spread the compound butter on the hot fish and leeks, and when plated, dust with the remaining rosemary.

That compound butter is killer!  I've chilled the leftover butter and will use it on green beans next week!


Citrus Pudding Do-Over
Doing it the “right” way made this pudding a lot more airy with fine bubbles rising to the surface and giving it a lighter texture and color. It also made the pudding twice as deep in the pan. 

 Same great taste either way, so take your pick of techniques. This version was much creamier, less cake-y in texture, but the crust wasn't as crusty because the zest was 'pureed' along with the other ingredients and did not rise to the top.


Conclusion??  Either way you make this you've got a really tasty "just lemony enough" dessert to surprise your guests with!


Roasted Root Veg
In our Produce box last week we go a nice selection of root vegetables – parsnips, large carrots, yellow beets – plus more celery than you could shake a stick at. So I tossed them with a bit of EVOO and some Old Bay tm seasoning, and roasted them for 45 minutes or so.

Served them up with a basic pork chop.


Strawberry Grapefruit Marmalade!
Another happy “accident”. I was multi-tasking one day, making a batch of grapefruit marmalade and slicing up a couple boxes of strawberries. The grapefruit I'd gotten was not particularly pink, nor particularly sweet after I'd taken it for a spin. I standing there looking at the fruit puree and the strawberries in their box. Something made me pick up three large strawberries, hull them, mash them and stir them into the grapefruit puree. After the usual trip in the microwave, I tasted the combination. 

Heavenly – you could taste the strawberry sweetness over what should be overwhelming grapefruit tartness! What a GREAT combination! I'll be making this many, many more times.


Moroccan Lemon Chicken
I did a dinner party for four on Friday night, over in St. James City on Pine Island; it was one of my charity donations to the Matlacha Hookers ladies fishing club and fundraising group. After some deliberation the hosts chose my Moroccan Lemon Chicken as the main course for their dinner for four.

I hadn't made the dish in quite some time. First I had to make Preserved Lemons. Quarter two or three lemons. Put a layer in a screw-top jar, and cover it with Kosher salt. Repeat with the remaining lemons. Now take a few more lemons, juice them, and fill the jar to the top with the lemon juice. Seal the jar and put it away in a dark place for at least two weeks to ferment. The lemons will last 6 months un-refrigerated, inyour pantry – make a couple jars!

Then I had to make some Ras el Hanut. The name means “best of the shop” which sounds pretty elegant. 

The blend was unique to each shop, created when the frugal spice merchants swept their countertops into a special container after each sale of an individual spice. The resulting melange of spices was labeled Ras el Hanut and sold as a special preparation!

Almost anything goes, but here's a reasonable start:
2 tsp ground Cumin
2 tsp ground Ginger
3 tsp Kosher or Sea Salt
2 tsp fresh ground Black Pepper
2 tsp ground Cinnamon
1 tsp ground Coriander
1 tsp Allspice
1 tsp Saffron (or Turmeric)

Stir everything together in a bowl and store in an airtight container.

For the Main dish:
4 Chicken Breasts
1 jar Kalamata olives, drained
1 jar Green Olives, drained
1 large Tomato, diced
1 large and one regular can Garbanzos (or cook up a large batch if you have a spare hour)
4 quarters Preserved Lemon
1-2 Tbsp Ras el Hanut spice mix
Large pearl Israeli Couscous for four


In a large, deep skillet (or the special Moroccan pot called a tagine, if you have one), brown the chicken on both sides, 4-5 minutes per side. Add the garbanzos and their liquid, then add the olives and tomato, the ras el hanut, and the preserved lemon. Cut each breast in half width-wise. Simmer everything together 30 minutes or so to marry the flavors, until the chicken is cooked through. Serve on a bed of couscous.