Monday, June 15, 2015

Tamales & Reviews

 Short post this week.  Yesterday was my birthday and life's been a little hectic, so I haven't cooked much lately.

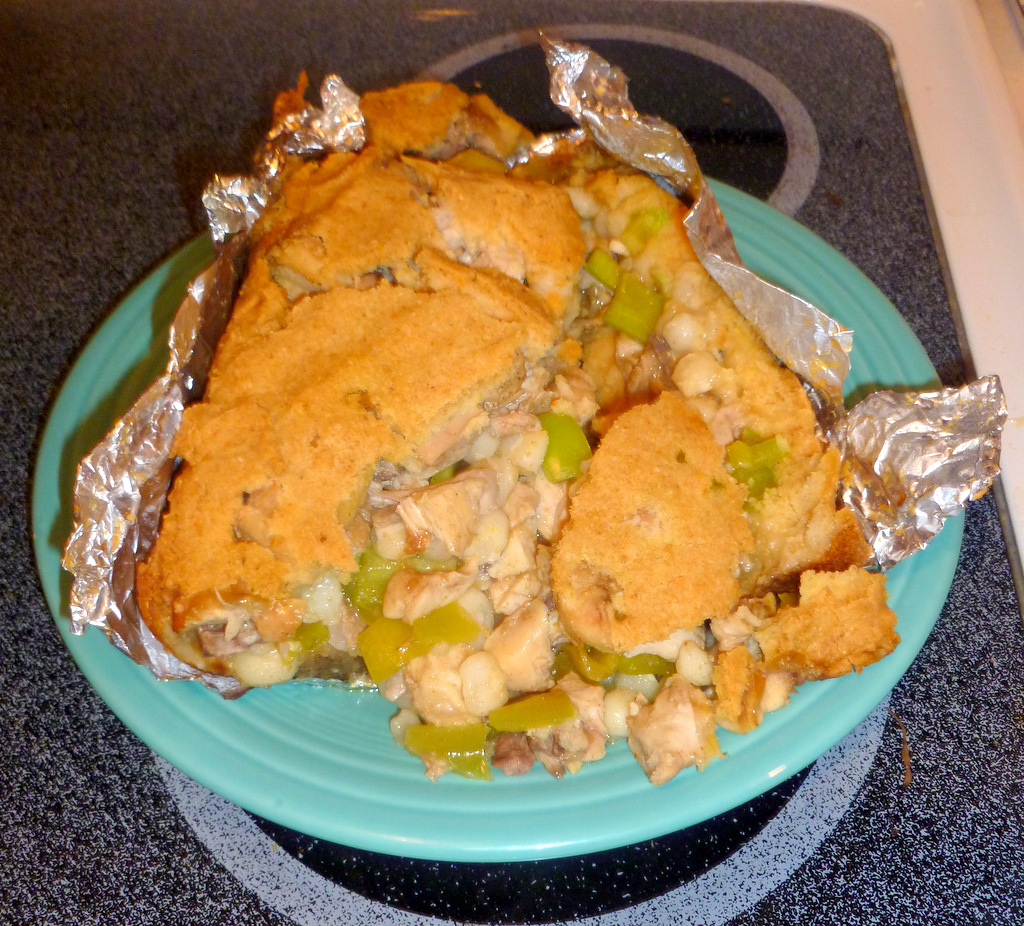
Cubano Tamales en Cazuela
If you love the taste of tamales, like I do, but hate the labor intensive process of making and wrapping and tying them, you're gonna love this recipe.  In the past I've made "tamales in a pot" by laying down a layer of masa dough on foil, then laying down filling in the center; and sliding this mass into a loaf pan, folding the top bits over, and baking.

This new recipe I discovered the other day looks even easier, and just as tasty.  It's sort of "stuffed polenta Cuban style", and looks like an award winner for the One Pot Meal challenge!

1 pound Pork Sirloin, minced (for Sally I will use chopped, cooked chicken)
1 large onion, chopped fine
1 roasted Red Bell Pepper, chopped fine
4 cloves Garlic, minced

1/4 cup olive oil for frying
1/3 cup tomato sauce
1/4 cup red wine
2 cups fresh or thawed frozen yellow corn 

 1/4 cup butter
1 1/2 cups masa harina
3 cups chicken broth
1/4 teaspoon Chile powder
2 limes, juiced 

 salt and pepper to taste

Broil or grill the pepper until it starts to blacken; then dice it, black bits and all.   

Toss the pork, garlic and onion together in a bowl and stir to combine with the lime juice.  Fry the mixture a minute or two before adding the bell pepper and red wine.  Simmer until the onion is translucent.  Reserve with liquid.

Chop or grind the corn in a food processor so that you have a coarse mix, not just whole kernals.  Stir to combine with the masa, chile powder and chicken broth in a pot.  Add the meat mixture and cook over low heat, stirring occasionally, for about 45 minutes until the mixture thickens significantly, but does not burn.  As one person said, "when it meets the Standing Spoon Test, you're ready to eat.

Ladle onto a plate or bowl, and garnish with pico de gallo or sofrito.


 Standing Spoon Test

My first way of making Tamal en Cazuela.  Here the tamal has been removed from the loaf pan and unwrapped, causing the crust to open up.


Reviews
As I said, I didn't cook anything special, or anything you hadn't seen before, over the weekend.  I did make salmon poached over OJ-infused courtbouillion one night; and Cajun Chicken & Vegetables another.   But I thought I'd tell you about two places we went to eat.

Norman Love Confections
Those of you around this area, and perhaps elsewhere will recognize the name.  Norman and his crew make some of the finest tasting, most beautiful chocolate creations on the planet.  Candies, chocolate sculptures that will take your breath away, and much more.   We can shop direct in several locations; the rest of you can mail-order from http://www.normanloveconfections.com/


Locally, they have also branched out into making superior gelato and similar frozen delights, as well as offering lunch crepes.   

We had to go out to their main location near the airport here, as Sally wanted to pick up some chocolates for her work-mate's birthday on Wednesday.  While we were there we had a pre-birthday lunch and gelato.  Sally got the Chicken Caesar crepe, and I opted for the Italian.  Both came with a nice bit of viniagrette pre-dressed greens.  Both crepes were very tasty, and you get the pleasure of watching the young lady behind the counter make the light airy 'pancake', and then fill it.  I found the Chicken Caesar to be the more filling of the two -- a better value for the money.  I liked the Italian Crepe, flavor-wise, but structurally it was just a couple slices of Boar's Head meats and cheeses wrapped in a pancake; where the Chicken Caesar was more substantial construction.  IMHO the Italian would be better filled with mini meatballs a splash of red gravy and some cheese.

I had the Coffee-Chocolate Chip gelato and the Raspberry.  Fabulous.  Sally had the Salted Caramel Chocolate and something else I don't recall.  Some of the best gelato anywhere!


Fancy's
For my birthday luncheon, Sally wanted us to try a new place in town -- Fancy's Southern Cafe.  Heck I like southern cooking, so off we went.
 
This is much more upscale than yo momma's Southern cooking.  

They have a nice menu, with some interestingly different appetizers like Deep Fried Cheese Grits, Boiled Peanuts, Deviled Eggs and Frog Legs as well as the obligatory Fried Okra and Fried Green Tomatoes.  Wanting dessert, we skipped the appetizers and went straight for the mains.  Sally had the Chicken Pot Pie,  I had Chicken and Waffles, and Sally's Mum had the Crabcakes.

BIG servings.  Mine was  three Belgian waffles and two breaded chicken cutlets, stacked Napoleon style and stuck with a steak knife to hold the stack together.  Their house "buttermilk maple syrup" sure was yummy.  I brought back leftovers and had them for breakfast this morning.

Mum had two or three nice sized crabcakes that were tasty, but she wasn't interested in the fried green tomato (which Sally and I split), or the undressed greens that came with (and no dressing offered).  She did like the Mac & Cheese side and the Spicy Coleslaw.

Sally's Chicken Pot Pie was "OK" she said, but the filling was very under-seasoned.  Their version is obviously made "restaurant style" in a large pot/pan and then ladled into a bowl before being topped with a square of puff pastry.  Nice presentation, though.  Her side of Sweet Potato Souffle was pretty tasty, but the green beans suffered from the traditional Southern technique of boiling all vegetables into limp and again under-seasoned submission.

For dessert we had a nice large serving of very tasty Key Lime Pie tastefully garnished with decorative dollops of whipped cream.  


Monday, June 8, 2015

Italian, Anglo-Greek and Mexican fare


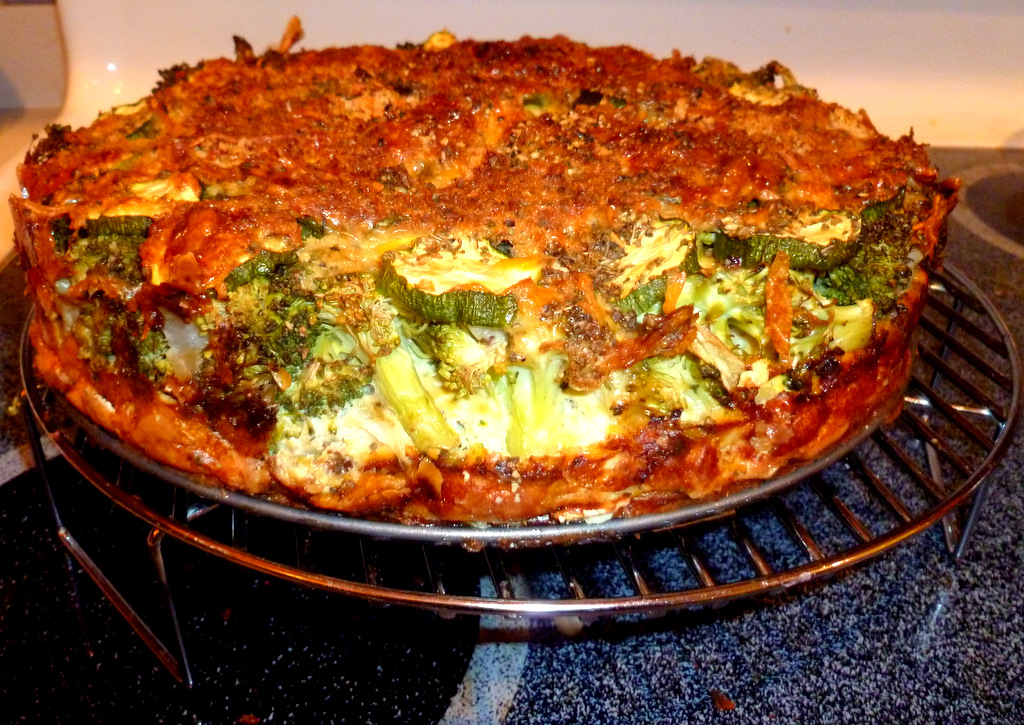
Vegetable Timbale
A timbale is a sort of "deep dish" quiche. If it's a really deep dish, say 8" or more -- and features a pastry crust overall -- the Italians call it a "timpano". Both names refer to a drum, describing (more or less) the container. In the old country, the recipe for a timpano was often a family secret, and contained assorted meats and sausages, vegetables, pasta, rice, and spices. This version is a simpler, vegetarian, no crust version.

8 oz Carrots, shredded
10 oz pkg Broccoli crowns
10 oz pkg Cauliflower crowns
1 Onion, diced
1 Zucchini, sliced into rounds
3/4 cup shredded Cheese
1 cup Half & Half
1/3 cup Breadcrumbs
7 Eggs, beaten
1/4 tsp Sage
1/4 tsp Black Pepper
1/4 tsp Cumin
1 Tbsp Oregano

In a 10" springform pan sprayed with non-stick, begin layering the vegetables. I started with the carrots, then the cauliflower, about half the onion, the broccoli, and the rest of the onion. On top I added the rounds of zucchini.   Top with the cheese and breadcrumbs (I used panko).

Mix together the eggs, half & half and spices, stirring well to combine. Pour the egg mixture over the top of everything. Place the springform pan on a baking sheet and put it in a pre-heated 400F oven for 1 hour. Allow to set for at least 20 minutes before slicing to serve.


Split Peas with Honeyed Eggplant
Sounds strange, doesn't it?  This is a sort of Anglo-Greek dish inspired by something I saw on the internet. The internet version had you cutting the eggplant into cubes and cooking it nearly into mush.  We both agree you want the eggplant to have some "tooth" -- don't overcook it.  The slight saltiness of the split peas counters the sweetness of the honey. Very tasty. This one went on Sally's "make it again" list.

for the Pease Porridge:
1 cup Green Split Peas
1/4 cup diced onion
1 large clove garlic
2 cups Chicken Broth
2 cups water
--------------------------

for the eggplant:
1 large or two small Eggplant
1/2 tsp Cavender's tm Greek seasoning
Olive oil from drizzling
Honey for drizzling

Cook the split peas, onion and garlic in the broth/water, about 20 minutes or until tender. Drain for at least half an hour to remove as much liquid as you can. Reserve. In England this would be called Pease Porridge -- as in the nursery rhyme "Pease porridge in the pot, nine days old."  

Slice the eggplant into 3/4" thick rounds, drizzle with olive oil and dust with the Greek seasoning. Actually I used a great extra-virgin avocado oil that I'd been given. Broil eggplant for about 5 minutes per side until nice and golden but not mushy. Meanwhile, re-heat the Pease Porridge in the microwave.

Plate the eggplant and drizzle with a bit of your favorite varietal honey. I used Avocado Flower honey from a local beekeeper. Top the eggplant with a nice layer of Pease Porridge.

   Even with the honey, this is a good candidate for Sally's 400 calorie or less dinner.


Chiles en Nogada
A classic dish from the Puebla region of Mexico. An interestingly different, and tasty, variation on Chiles Rellano (stuffed chiles).   This just goes to show you that not everything in Mexico is hot or hotter!    Nogada is the Spanish word for Walnut.

You can use Cubanelles, Anchos, Anaheims or New Mexico chiles depending on what's available and what you like, heat-wise.  I would not do this with ordinary green bell peppers though, it would be too sweet.

Makes 4 stuffed Cubanelle size peppers, two servings.

for the stuffing:
1 cup chopped, cooked Pork Roast
4 Cubanelle chiles 
1/2 cup diced Onion
1/4 cup Raisins
1/4 cup Dried Cranberries or Craisins
1/2 Red Bell Pepper, diced
1/4 cup Green Chile Tomatillo Sauce
1/ Tbsp Cumin
 1/2 cup Water
1-2 Tbsp Masa Harina for thickening

-------------------------

for the Nogada:
Mexican Crema
1/4 cup Walnuts


Simmer the stuffing ingredients, except for the masa, for 15-20 minutes on medium-low, to marry the flavors.  Add a tablespoon or so of masa and stir to thicken.  Reserve.

While the stuffing is simmering, prepare the chiles.  Cut of the stem and and remove the veins and seeds.  If you're in a hurry, just microwave the peppers until soft.  For the best flavor, broil the pepper for a few minutes on each side, until they start to char.  

To make the nogada, grind the walnuts, but only enough so you have some dust and some chunks.  Combine with the crema and stir.  Don't add so many nuts that the nogada is stiff.

Stuff the cooked peppers with the meat/fruit mix.  Plate the stuffed peppers and top with a couple spoonfuls of the nogada crema.


Pickle Update

Well the pickles were a success.  The brine recipe is just right -- not too salty, not too sweet.  The Moringa pods pickled nicely, but you still don't want to use pods thicker than a pencil.  I'm going to strip a bunch of small pods and make a jar of  Moringa pickles.   Yum.

Monday, June 1, 2015

Vietnamese Pickles, Homegrown Goodies, 400 Calorie Dinner and more


Lady Sally wants me to start marking items in the blog that make great 400 Calorie Dinners or Entrees. This week check out the Falafel Burgers. 

 I have for years, used the online site Nutrition Data, to calculate the nutritional values of recipes: http://nutritiondata.self.com 
 

Vietnamese Pickles
I was reminded of these the other day, and how tasty they are. Not the same as pickled cucumbers at all. Simple to make too. Just do up a couple jars at a time. The amount of pickling liquid here will make 3 pints of pickles.

9" to 10" length of 2-3" diameter Daikon, scrubbed
1/2 cup or so of julienned Carrots
4 cups hot water (tap hot, not boiling)
3 Tbsp Sugar
2 Tbsp Kosher Salt (less if you use table salt)
6 Tbsp Rice Wine Vinegar

Cut the daikon into thin disks and then slice into a nice julienne cut. You can do the same with some large carrots, or buy a bag of pre-cut julienne carrots (which I did for other purposes).

In another bowl mix the water, vinegar, sugar and salt, and stir until everything dissolves.

Take three pint jars and fill them with the daikon/carrot mix. Pour the liquid overall and screw on the tops. Refrigerate, and wait at least 3 days before consuming. Will last in the fridge at least a month or so.

The same brine solution can also be used with any cut veggies -- onion slices, green or wax beans, slices of bell pepper, okra, baby corn,cauliflower, etc. 


Falafel Burgers
Well, I created a much better falafel this time. The recipe makes 3 giant patties 4" in diameter and over 3/4" thick. Half a patty would fill half a pita, as a sandwich. Or make a bunch of mini patties as an hors d'oeuvre/snack.

1-1/2 cup Garbanzo Flour
1/2 tsp Baking Soda
1 tsp Kosher Salt
1/3 cup Diced Onion
1/3 cup minced Parsley
3 large cloves of Garlic, minced
1-1/2 tsp ground Coriander
1-1/2 tsp ground Cumin
1 Egg, beaten
1 Tbsp Lemon zest (about half a lemon worth)
1/3 cup Panko
3/4 cup hot but not boiling water

Mix the flour, salt, soda and spices. Add the onion, zest and parsley, and mix again. Stir in the water and egg to form a wet dough, then stir in the panko to tighten things up so it's not too sticky when you form the patties. Pan fry in some EVOO until GB&D. Serve with hummus or tomato slices or lemony Greek yogurt or any number of other goodies.


One of these patties is about 270 calories, making a great tasting, very filling entree for an Under 400 Calorie Dinner.


Homegrown Pigeon Peas
We planted several bushes of pigeon peas around Sally's yard last summer and got a handful of seeds by fall. Saved those in the fridge, and we got a second flowering and a ton more pods this spring. I let thosepods dry on the bushes, then cracked the peas from the pods (much easier than shelling green peas from soft pods, believe me!)   Then I soaked the dried peas overnight in plain water to plump them up, and cooked them in water for about 30 minutes until tender. Dusted them with a little Arhar Dal Indian spice blend after they cooked and drained. These were the side dish for my Falafel Burgers.  Yuuummm!


Moringa Pods
We planted a Moringa a year ago and have been harvesting the leaves to make healthy tea.  I have plenty for sale if anyone is interested.

We finally go some pods on, this spring, and I'm harvesting them now, as well. Almost everything on the tree is edible.

When boiled/steamed like green beans, the slender (pencil sized or smaller) pods are very tasty, with overtones of artichoke. Simply cut the 12-16" long pods into 1-2" lengths and cook.

The large pods, up to 1/4" diameter or so, can also be boiled/steamed, but their outer skin is harder. These are best eaten like artichoke leaves - after cooking, split the pod pieces lengthwise, bite down, and rake the goodness in with your teeth.   The taste a bit like asparagus.

I'm also experimenting with pickling the Moringa pods using the Vietnamese Pickle recipe. Will let you know next week how that turns out.


Mom's Mac & Cheese 
I don't make this very often - otherwise I'd weigh 300 lbs!  But Sally needed a potluck dish for work, so I made a large batch and baked it in two containers.  This is not your usual "cheese soup with macaroni" kind of Mac & Cheese!

1 lb box Elb0w Macaroni
1 lb Colby Cheese (or a mild Cheddar)
1/4 cup shredded Colby or Cheddar for topping
Black Pepper to Taste
1 pint Whole Milk

Cook the macaroni according to package directions for 'firm'.  While that's going on cut the block cheese into cubes.

Put about an inch deep layer of macaroni in a 10" loaf pan.  Dust with a little black pepper.  Add  about half the cubed cheese.  Add a second layer of macaroni and top again with cubes of cheese and the shredded cheese.  Pour about 1 cup of milk overall.  Bake at 375F for 45 minutes.  Let it rest for 20 minutes or more so the cheesy crust hardens.   Slice and serve.


I never get this quite right.  As you can see, I've either added too much milk, or not cooked it long enough or hot enough.  The milk is supposed to cook up through the first cheese layer, which it did, but not all of it got absorbed.  Guess I'll have to try again.


Monday, May 25, 2015

While The Cat's Away...

...the Chef will play.  Sally spent the holiday weekend at an annual conference for her profession. So while she was gone, and I was house/cat/dog sitting,  I made some of the dishes that I love, which she's not particularly fond of.


Pork Sirloins with Tomatillo-Green Chile Sauce
Not a dish from a specific Latin culture, but it borrows heavily from Mexican cuisine. All my own invention.  As you'll see the sauce is good for other things too.

3 Pork Sirloins
3 large Tomatillos
1 small can Diced Green Chiles
1 Cubanelle chile or a seeded, deveined Anaheim, Poblano or similar mild chile
Cumin to taste
Pepper Medley to taste
Smoked Paprika to taste
1 Tbsp Masa Harina (corn flour) for thickening

Take the papery outer husk off of the tomatillos and slice them up fine. Remove the end from the cubanelle and chop into small pieces. In a small pot combine the tomatillos, and the chiles. Season with cumin and a grind or two of Pepper Medley. Simmer on low until everything is tender and falling apart -- about 15 minutes. Then add a dusting of the masa, and whisk to help thicken the sauce.

Meanwhile, oil your griddle or electric skillet and start frying the pork sirloins. Dust each side of the meat with cumin, smoked paprika and pepper. Fry on medium heat until just cooked through. I cover them with a skillet lid to help keep the moisture in. Nothing worse than dried out pork!

I served myself a sirloin steak with the sauce and a helping of Tropical Rice -- jasmine rice cooked with a packet of the Sazon Tropicaltm spice blend.


The sauce is also fabuloso on Chicken or firm white fish like Cod, Mahi mahi, Sea Bass, etc.


More Tomatillo-Green Chile Sauce Ideas


Breakfast Burrito
A couple tablespoons of leftover Tomatillo-Green Chile sauce stirred into a beaten egg and then scrambled makes a great Latin-flavored breakfast burrito. 


Chilaquiles
I discovered this dish in the village of San Franciso de Nayarit, Mexico quite a few years ago. Leftover tortillas and eggs scrambled together with a sauce or salsa (usually green not red) make a fabulous breakfast. Add pieces of cooked chicken for an excellent lunch dish, too.

Day old, or left-out-overnight tortillas are best. Cut or rip them into pieces and fry with some oil until some are nearly black, some are crispy, and others are still soft. Then pour beaten eggs overall and as they start to scramble, add some of the Tomatillo-Green Chile sauce and continue scrambling until done to your taste.


Ham & Cheese Cornbread
A great thing to do with leftover holiday ham. Manchego is a Spanish goat cheese, moderately hard. I happened to have just a small piece left. You could substitute a hard white cheddar.

1 box Jiffy tm Corn Muffin mix
1 Egg
1/3 cup Half & Half
2 cups cubed Ham
1/3 to 1/2 cup diced Manchego cheese*
Smoked Paprika for dusting

Combine the boxed mix with the half & half and the egg. Add the ham and stir to combine. Pour into a small loaf pan and tap to settle the mix. Dust with a little smoked paprika, then sprinkle the cheese dice on top and press the pieces into the surface. Bake 20-25 minutes @ 400 F.


Strawberry Rhubarb Pie
I made this as a surprise dessert for Sally when she got home from her conference on Sunday.  As a kid, I  grew up with a huge rhubarb 'bush' in the backyard, and I've always loved the tart-sweet flavor of rhubarb sauce on ice cream or just in a bowl, plus rhubarb pie (with or without strawberries).

2 cups diced Rhubarb
2 cups quartered Strawberries
3 Tbsp Corn Starch
6 Tbsp AP Flour
1-1/2 cups Sugar - white, brown or mix
1/2 tsp Vanilla extract
1 tsp Orange zest
1 prepared Graham Cracker Pie Crust

Mix the dry ingredients - corn starch, flour, sugar, vanilla and orange zest. To this add the cut fruit, toss to combine and let it sit for half an hour or so.

Pour the fruit into the pie crust. With the filled pie on a baking sheet, bake at 425F for 15 minutes, then reduce heat to 375F and cook an additional 45 minutes. Rest the pie at least half an hour, so it sets up.  Better even if you can leave it until the next day before cutting. Can be garnished by additional halved strawberries and then topped with whipped cream for serving; or English style, topped with custard.


Strawberry-Rhubarb Sauce
I had about a cup of cut strawberries and a cup of rhubarb pieces left, so I simmered them with 1/3 cup dark brown sugar, 1 cup white sugar, about 1/8 tsp cinnamon, juice of half a lemon and most of a cup of water. When the fruit was cooked (15 minutes or so), I mashed it with my Pampered Chef tm 5-blade masher (you could also spin it in a blender), then transferred the sauce to a screw top jar and stowed in the fridge when it cooled. Will make a fabulous topping for ice cream, pound cake, etc.


Monday, May 18, 2015

Pastitsio and Marmalade My Way

I discovered Pastitsio a couple weeks back, but didn't get a chance to try it until Saturday.  We sure liked it as an alternative to the typical tomato/red sauce lasagna recipes.  Spicing savoy dishes with cinnamon and nutmeg are uncommon in Western European/American fare, but very common from the Eastern Mediterranean into the Middle East.


Pastitsio
Often called "Greek Lasagna", Pastitsio belongs in the class of Baked Pasta dishes along with lasagna, baked ziti, etc. In this case, a layer of meat mixture between two layers of pasta, with a white sauce poured overall, then topped with cheese before baking.

Traditionally Pastitsio is made with ziti or similar small tube pasta to catch and hold the bechamel sauce. A couple years back, Ina Garten, the Barefoot Contessa from Food Network created a version using small shell pasta. My version combines small and large shells, and jar-ed alfredo sauce rather than making bechamel sauce from scratch.

16 ox box Large Shell pasta
8 oz Small Shell pasta
1-1/2 lbs Ground Sirloin - 90/10
2 jars Alfredo Sauce
1 White Onion, diced
1 tsp Cinnamon, ground
1 tsp Nutmeg, fresh ground
1/3 cup Panko or other bread crumbs
1/4 cup fresh Parsley, chopped
1/4 to 1/2 cup chopped Kalamata or similar olives,
1 14-16 oz can diced tomatoes, drained
8 oz shredded Parmesan (not the stuff in the round container)
8 oz Shredded Mixed Italian Cheese blend

Cook the pasta al dente to package directions. Brown the meat, remove from the pan; saute the onions in the same pan. Add the meat back, and add the tomatoes, spices, olives and parsley. Simmer about 15 minutes to marry the flavors. Add half of the bread crumbs to absorb the liquid remaining. Reserve.

When the pasta is cooked, drain, and then toss with one jar of the alfredo sauce. In a deep 9x13 baking dish, layer half of the pasta, then a thin layer of both cheeses, topped by the meat mixture. Add the rest of the pasta in a second layer. Pour the second jar of alfredo over the top and spread it out. Top with the remaining bread crumbs and cheese. Bake at 375-400F for 40-45 minutes until the top is golden brown and crusty delicious. Let rest for 15-20 minutes before cutting, to make sure everything is set in nice layers.


Try it, you'll love it -- rich and meaty and unctuous.....  I can hardly wait for leftovers for dinner tonight!


Marmalade My Way
I've talked about this before -- a year ago or more -- so I thought I'd give you a sort of photo-tutorial on making marmalade from any citrus fruit, or combination of citrus fruits, in ten minutes.

First pick your citrus fruit -- either literally like we can here in Florida, or from a grocery display. Any citrus fruit will do -- Ugly Fruit, Pommelo, Pink or White Grapefruit, assorted Lemons and Limes, Loquat, Kumquat, etc.    Mango and Starfruit and some of our other tropical fruits unfortunately don't work with this method -- not enough pectin in the skin.   You can add up to, say, 25% non-citrus fruit -- I often add a starfruit to the blend -- but you may want to add a bit of extra skin for the added pectin.  I often freeze 'juiced-out' lemons for exactly that purpose.


For a pint you'll want a largish grapefruit, or a naval orange plus a lemon and a lime, or 2-3 oranges, or 5-6 lemons... you get the point.  A pint lasts most families a month or so.
The only other ingredient is sugar. White, light brown, dark brown, demerarra, piloncillo, it doesn't matter;  although darker sugars may not make as pretty marmalade. You can also use Splenda tm if you're diabetic or otherwise watching your sugar intake.

Chop your fruit into finger tip size pieces -- skin, pith, juice seeds and all. Here I used ordinary lemons.  The skin contains most of the pectin, which is what makes marmalade set up. Skin in the jam also give you that essential marmalade look.


Put the fruit in a blender or food processor and take it for a spin.
 Don't go for a puree; you want that "look" with the pea or small sized bits of rind.
Measure the proto-marm into a microwave-safe glass bowl. 


Don't use a plastic bowl unless you want to clean out the inside of your microwave! Trust me on that...  Add the same measure of sugar -- cup for cup, and stir to combine. Taste the result. Too tart, add a bit more sugar. Too sweet, add a bit more fruit.


Microwave the fruit/sugar mix on high for a total of 10 minutes. I usually do 5 and 5, and give things a stir in between.


CAREFULLY remove the scaldingly hot bowl from the microwave, and ladle the marmalade into screwtop jars -- Mason tm jars or washed out pickle jars or what-have-you. Taking the jar hot from a cycle in the dishwasher is probably the most sanitary and mold free; but at least wash and rinse the jar just before filling it.


Leave the filled jar set, covered with a tea towel or paper towel, until the jar cools to room temperature. Why?  To keep random airborne molds from settling in there and creating a science experiment for you!  Then seal the jar and store in the fridge. It will last a couple months in the fridge, or until you use it up, whichever happens first.